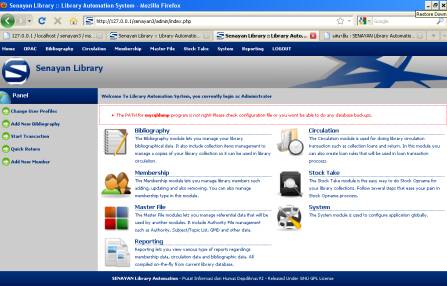
บันทึกขั้นตอน จากกิจกรรมปรับปรุงรุ่นของโปรแกรมแก้วสารพัดนึกใน thaiabc.com เป็นรุ่น 8.0 โดยเพิ่ม moodle1.9.12 จากที่มี moodle1.5 ทำให้มี e-learning ใช้ 2 รุ่นและเปรียบเทียบกันได้ เหตุผลที่เลือก 1.9 เพราะที่ thaiall.com/moodle ใช้รุ่นนี้มาปีกว่าแล้ว แต่ไม่ใช้รุ่น 2.0 ขึ้นไป ด้วยเหตุว่า backup ในรุ่น 2.0 จะนำไป restore ใน 1.9 ไม่ได้ ถ้านำ backup ของ 1.9 ไป restore ใน 2.0 นั้นทำได้ และจากการทดสอบ restore course จาก thaiall.com/moodle ในเครื่องใหม่นี้ พบว่านำมาใช้ได้ตามปกติ
—
ขั้นตอนการติดตั้ง moodle 1.9.12
1. เปิดบริการ apache2.0.52 และ mysql5.5.16
ตอนเปิดบริการในเครื่องที่ติดตั้ง skype อาจพบปัญหา port 80 ชนกันได้ครับ
2. เตรียม scripts ในห้อง /moodle19
3. สร้างห้อง /moodledoc19 เตรียมรับข้อมูลจากผู้ใช้
4. เริ่มติดตั้งด้วยการเรียก /moodle19/install.php
5. ต้องแก้ไข register_globals=Off ใน php.ini แล้วก็ restart apache
ถ้าไม่รู้ว่า php.ini อยู่ห้องใดก็เรียก function phpinfo()
6. พบขั้นตอนการติดตั้งดังนี้
– Checking your PHP settings
– Please conform the locations of this Moodle installation
Web Address = http://127.0.0.1/moodle19
Data Directory = C:\thaiabc\moodledata
– Now you need to configure the database
Type = MySQL
Host Server = localhost
Database = moodle19 (Create DB automatically)
User = root
Password = ว่างไว้
– Checking your environment
– Download language pack
– Configuration completed
– Copyright notice
– Current release information Moodle 1.9.12 (Build: 20110510)
– Setting up database : Database was successfully upgraded
– Setup administrator account.
Username = admin
password = Password#2555
– New settings – Front Page settings
Self registration = Email-based self-registration
7. ผลการเรียก http://127.0.0.1/moodle19 พบว่าปกติ
8. สร้างวิชา และ upload แฟ้มภาพ และเรียกใช้แฟ้มภาพ ไม่พบปัญหา
—
ขั้นตอนการ Restore course ของ moodle 1.9.12
1. เข้าไปในวิชาที่สร้างไว้แล้ว
2. เลือก Restore
3. เลือกแฟ้มที่ Backup ไว้จาก server อีกตัวหนึ่ง
4. เมื่อถามว่า Restore to
– Current course, deleting it first
– Current course, ading data to it
– new course
5. ทดสอบทั้ง 3 แบบ พบว่าใช้งานได้ปกติ
6. ถ้าทดสอบ new course ก็จะได้วิชาใหม่อีก 1 วิชา ไม่ทับวิชาเดิม
—
ขั้นตอนการติดตั้ง senayan3
1. เปิดโปรแกรม phpmyadmin
2. สร้าง db : senayan3 แล้วเข้าไปใน db นี้
3. สั่งประมวลผล sql 2 แฟ้มในห้อง /senayan3/sql/install
4. เริ่มจาก import แฟ้ม senayan.sql ตามด้วย sample_data.sql
5. แก้ไข sysconfig.inc.php
define(‘DB_NAME’, ‘senayan3’);
define(‘DB_USERNAME’, ‘root’);
define(‘DB_PASSWORD’, ”);
6. เข้าระบบด้วย
user: admin
password: admin
7. ทดสอบที่ http://127.0.0.1/senayan3 พบว่าใช้งานได้ปกติ
8. แก้ไขตัวแปรใน sysconfig.inc.php อีก 2 ตัวแปร
$sysconf[‘mysqldump’] = ‘c:/thaiabc/mysql/data’;
$sysconf[‘temp_dir’] = ‘c:/tmp’;
http://www.thaiall.com/blog/burin/3955/
http://slims.web.id/web/
http://sourceforge.net/projects/senayanlib/
http://www.senayan.kru-ple.com/
—
SENAYAN 3.0 stable
Core Senayan Developer :
Hendro Wicaksono – hendrowicaksono@yahoo.com
Arie Nugraha – dicarve@yahoo.com
Below are the instructions for new installation of SENAYAN :
1. Put senayan3-stable3 folder in web document root
2. create senayan database in mysql
3. Open your phpMyAdmin or mysql client utility (or other mysql manager softwares) and
run sql/install/senayan.sql inside your SENAYAN application database.
4. Re-check your database configurations and others configuration in sysconfig.inc.php.
5. If you have your own custom template, Adjust detail_template.php file or just overwrite it
with detail_template.php from default template directory