#Android Studio ตอนที่ 8 การใส่ภาพและคำสั่ง HTML ใน TextView ต่างกันทั้ง Java, Layout และ String

#Android Studio ตอนที่ 8 การใส่ภาพและคำสั่ง HTML ใน TextView
ต่างกันทั้ง Java, Layout และ String

<introduction>
อารัมภบท
การทำให้ตัวอักษรหนา หรือ Bold ใน TextView มีเงื่อนไขต่างกันทั้งใน Java, Layout และ String ในตอนนี้จะเน้นว่าทำอย่างไรให้แสดงผลได้ ไม่อธิบายส่วนของปัญหา เพราะการใส่ Html Tag ใน TextView ไม่เหมือนการเขียนเว็บเพจด้วยภาษา HTML พบว่า มีข้อจำกัดมาก ถามกันเยอะใน stackoverflow.com ไปอ่านใน guide ของ android.com พบว่า Supported HTML elements include:

  • <b> for bold text.
  • <i> for italic text.
  • <u> for underline text.

อันที่จริงยังมี Tag ที่ได้รับการสนับสนุนมากกว่านี้ ถ้าอ่านเพิ่มเติมที่ abhiandroid.com และ grokkingandroid.com หากจะให้สรุปก็คงเห็นพ้องกับ Developer หลายท่านว่าการใช้ Html บน Android Studio มี 2 คลาสที่รองรับคือ TextView กับ WebView ถ้าให้ดีควรเลือกใช้ WebView เพราะ TextView สนับสนุนการใช้ HTML น้อยกว่า โดยเฉพาะการใส่ Image ที่ต้องสร้าง Class ImageGetter มาช่วย

แต่ TextView เป็น Class ที่นิยมใช้งานกัน การพยายามใส่ Image และ HTML ลงไปก็น่าจะมาถูกทาง เพียงแต่ Android Studio มี Class อื่นที่สนับสนุนงานด้าน HTML มากกว่า หากใช้งาน HTML จริงจัง คงต้องไปใช้ WebView แต่ถ้างานเล็ก ๆ จะใช้ TextView ก็น่าจะพอรับมือไหว ตัวอย่างในตอนนี้จึงมุ่งมั่นจะใช้ TextView เพื่อแสดง image และ HTML Tag แล้วลองติดตามดูครับ งานนี้ Activity Template เริ่มต้นผมเลือกใช้ คือ Basic Activity

สรุปกระบวนการได้ .. ขั้นตอน ประกอบด้วย 1) ทำความเข้าใจ Project ที่นำมาพัฒนาต่อ 2) ทดลองใส่ Tag:img ใน strings.xml 3) สร้างคลาส ImageGetter เพื่อให้แสดงภาพ ตาม Tag:img 4) สร้าง layout ใหม่ และ string ที่มี HTML tag หลายตัว 5) ทำให้ปุ่มสั่งเปิด Layout ใหม่ได้ และ Tag:img ทำงานได้ 
</introduction>

กำลังเล่าเรื่อง การใช้โปรแกรม Android Studio สู่เพื่อนนักพัฒนา ผ่าน Blog

<process>
1. ทำความเข้าใจ Project ที่นำมาพัฒนาต่อ
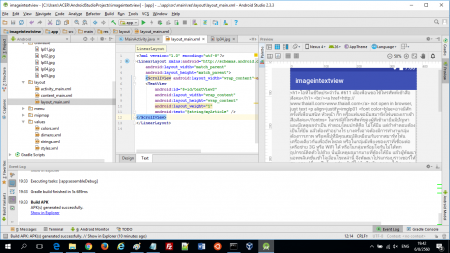
สร้าง New Project แบบ Basic Activity ชื่อ imageintextview
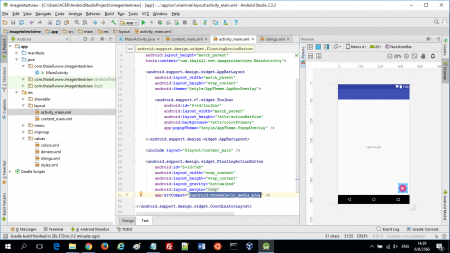
จะมีปุ่มที่เป็น FloatingActionButton ใน activity_main.xml
ตามที่เล่าใน ตอนที่ 7 : ข้อ 6 กับข้อ 7 ต่อไปปุ่มนี้ก็จะเป็นปุ่มเปลี่ยนบทความให้กับ App
ให้มองหา app:srcCompat=”@android:drawable/ic_dialog_email”
เปลี่ยนเป็น app:srcCompat=”@android:drawable/ic_media_play”

ส่วนปุ่มนี้จะไปเปิด layout ตัวใด ให้ขึ้นมาแสดงผล
ยังไม่ได้ปรับใน MainActivity.java รอไปทีละขั้น เพราะยังไม่ถึงเวลาของขั้นนี้
แต่เห็นว่า ตอนนี้มี <include layout=”@layout/content_main” />
อยู่ใน activity_main.xml ซึ่งจะเรียก content_main.xml เมื่อเริ่มต้นอยู่แล้ว

2. ทดลองใส่ Tag:img ใน strings.xml
2.1 เริ่มต้นจากการไปหาภาพตัวอย่างมา 5 ภาพ
แล้วใส่ภาพที่หาได้ เข้าไปใน drawable หามา 5 ภาพ คือ lp01.jpg ถึง lp05.jpg
เรื่องนี้เล่าใน ตอนที่ 6 ข้อ 1 มีแบบผ่าน Windows Explorer และผ่าน Android Studio

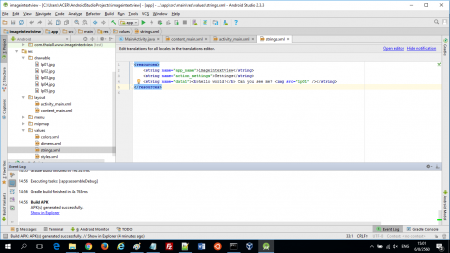
2.2 ใส่ข้อมูลใน string.xml ประกอบด้วย ข้อความแบบหนา ข้อความธรรมดา และแท็กภาพ

<string name=”data1″>
<b>hello world!</b> Can you see me? <img src=”lp01″ />
</string>

ใน layout_main.xml ที่ Template เตรียมมาให้ใน Basic Activity นั้น
มองหา android:text=”Hello World!”
เปลี่ยนเป็น android:text=”@string/data1″
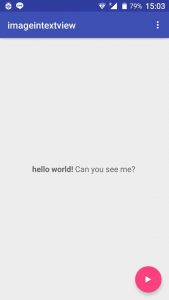
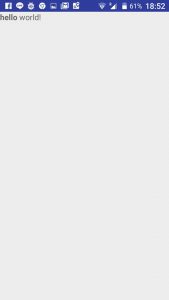
ถ้า run ตอนนี้
จะเห็นข้อความ Hello world! เป็นตัวหนา
ส่วนข้อความ Can you see me? เป็นตัวธรรมดา
แต่ภาพ lp01 ไม่เห็นว่ามีภาพนี้ออกมา
อธิบายในเบื้องต้น คือ TextView ไม่สนับสนุนการใส่ Tag:img แแบบนี้
ถ้าให้เห็นต้องทำขั้นต่อไป


3. สร้างคลาส ImageGetter เพื่อให้แสดงภาพ ตาม Tag:img
3.1 จะใช้งาน Tag:img ใน TextView ได้ต้องมีคลาส ImageGetter ใน MainActivity.java ก็เริ่มจากไปหาคัดลอกคลาสนี้มา แล้วเปลี่ยน packagename เป็น ของท่าน ของผมใช้ com.thaiall.www.imageintextview ใน code กำหนดขนาดภาพที่ผ่านคลาสนี้ให้กว้าง 48*2 และ 64*2 โดยตัวอย่างนี้มี 2 ส่วนคือ ส่วนของ import และส่วนของคลาส ให้สร้างไว้ภายใน class MainActivity
ปล. พอมี ImageGetter แล้ว ในหัวข้อ 3.4 จะเรียกใช้ผ่าน Html.fromHtml ()

import android.text.Html;
import android.os.Build;
import android.graphics.drawable.Drawable;

private class ImageGetter implements Html.ImageGetter {
public Drawable getDrawable(String source) {
int id;
id = getResources().getIdentifier(source, “drawable”, getPackageName());
if (id == 0) {
// the drawable resource wasn’t found in our package, maybe it is a stock android drawable?
id = getResources().getIdentifier(source, “drawable”, “com.thaiall.www.imageintextview“);
}
if (id == 0) {
// prevent a crash if the resource still can’t be found
return null;
}
else {
Drawable d;
if (Build.VERSION.SDK_INT >= Build.VERSION_CODES.LOLLIPOP) { //>= API 21
d = getResources().getDrawable(id, getApplicationContext().getTheme());
} else {
d = getResources().getDrawable(id);
}
//d.setBounds(0,0,d.getIntrinsicWidth(),d.getIntrinsicHeight());
d.setBounds(0,0,48 * 2,64 * 2);
return d;
} } }

3.2 การทำให้มีข้อมูลปรากฎใน TextView ผ่าน MainActivity.java
เริ่มต้นจากตั้งชื่อให้ TextView ใน content_main.xml
โดยเพิ่มว่า android:id=”@+id/textView”

3.3 เปลี่ยน data1 และเพิ่ม data2
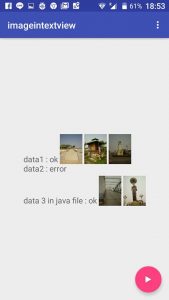
เพื่อแสดงเทคนิคการจัดการ Tag:img ว่า ใส่แบบ data2 แล้วไม่สำเร็จ
ต้องใส่ Tag:img แบบ data1 ใน strings.xml แล้วใช้ java ช่วยจัดการ

<string name=”data1″>data1 : ok imglp01 imglp02 imglp03</string>
<string name=”data2″>data2 : error <img src=’lp01′ /> <img src=”lp02″ /></string>

3.4 หลังเตรียมข้อมูลใน strings.xml ก็มาเตรียม code ที่จะจัดการกับ Tag:img
โดยเพิ่ม code ข้างล่างนี้ใน MainActivity.java เพื่อจัดการ content_main.xml

import android.content.res.Resources;
import android.widget.TextView;
Resources res = getResources();
String mData1 = res.getString(R.string.data1);
String mData2 = res.getString(R.string.data2); // error here
String mData3 = “data 3 in java file : ok <img src=\”lp04\” /> <img src=lp05 />”;
for(int i=1;i<=3;i++) {
mData1 = mData1.replace(“imglp0” + i, “<img src=lp0″ + i + ” />”);
}
String[] mList ={mData1,mData2,mData3};
String mData = android.text.TextUtils.join(“<br/>”, mList);
TextView htmlTextView = (TextView)findViewById(R.id.textView);
if (android.os.Build.VERSION.SDK_INT >= android.os.Build.VERSION_CODES.N) {
htmlTextView.setText(Html.fromHtml(mData, Html.FROM_HTML_MODE_LEGACY, new ImageGetter(), null)); // for 24 api and more
} else {
htmlTextView.setText(Html.fromHtml(mData, new ImageGetter(),null)); // or for older api
}

https://gist.github.com/thaiall/9fcead1b4fb4baea6b0751957e5df56f

4. สร้าง layout ใหม่ และ string ที่มี HTML tag หลายตัว 
4.1 สร้าง layout_main.xml
แล้วลาก TextView มาวาง เหมือนใน ตอนที่ 7 ข้อ 4
แล้วเติม ScrollView คลุม TextView ตาม ตอนที่ 7 ข้อ 5 ด้วย
พบว่า id ของ TextView คือ android:id=”@+id/textView2″

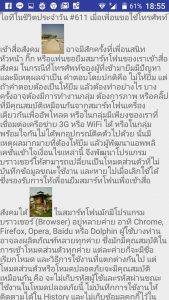
4.2 เตรียม myArticle ใน strings.xml ที่มีข้อมูลครบถ้วน
จากการไปอ่านบทความของ grokkingandroid.com ทำให้รู้ว่าใน string ต้องใช้ Entity reference คือ &lt; ตอนปิด Tag ไม่จำเป็นต้องใช้ &gt; ก็ได้ หากส่งเข้า TextView ผ่านฟังก์ชัน setText() ในโปรแกรม Java อย่างที่ใช้คือ MainActivity.java

<string name=”myArticle”>
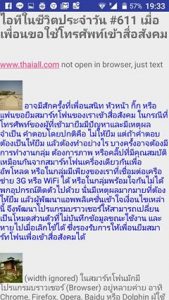
&lt;h1&gt;ไอทีในชีวิตประจำวัน #611 เมื่อเพื่อนขอใช้โทรศัพท์เข้าสื่อสังคม&lt;/h1&gt;&lt;br/&gt; อาจมีสักครั้งที่เพื่อนสนิท หัวหน้า กิ๊ก หรือแฟนขอยืมสมาร์ทโฟนของเรา …
</string>

https://gist.github.com/thaiall/b220a4cb2b8137f747648c56a5bd086d


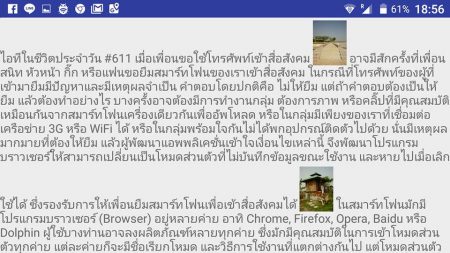
5. ทำให้ปุ่มสั่งเปิด Layout ใหม่ได้ และ Tag:img ทำงานได้
การปรับเพิ่ม MainActivity.java สำหรับรองรับการสั่งเปิด layout_main.xml
เริ่มจากการเพิ่มคำสั่งใน Activity เมื่อคลิ๊กปุ่ม
โดยเพิ่มใน Block : onClick ของ fab.setOnClickListener(..)
เพื่อคุม FloatingActionButton
ทำตาม ตอนที่ 7 ข้อ 6 มีคำสั่งเพียงบรรทัดเดียวที่ต้องเพิ่ม

setContentView(R.layout.layout_main);

แล้วตามด้วยชุดคำสั่งที่ต้องเพิ่ม

Resources res = getResources();
// for layout_main.xml
String mArticle = res.getString(R.string.myArticle);
for(int i=1;i<=3;i++) {
mArticle = mArticle.replace(“imglp0” + i, “<img src=lp0″ + i + ” />”);
}
TextView htmlTextView2 = (TextView)findViewById(R.id.textView2);
if (android.os.Build.VERSION.SDK_INT >= android.os.Build.VERSION_CODES.N) {
htmlTextView2.setText(Html.fromHtml(mArticle, Html.FROM_HTML_MODE_LEGACY, new ImageGetter(), null)); // for 24 api and more
} else {
htmlTextView2.setText(Html.fromHtml(mArticle, new ImageGetter(),null)); // or for older api
}


https://gist.github.com/thaiall/1e23a3bcf79ee293b6b4baea14bcfd9a

</process>

<website_guide>
+ http://abhiandroid.com/ui/html
+ http://www.grokkingandroid.com/..html-fromhtml/ (webview better)
+ https://developer.android.com/../string-resource.html (&lt;)
+ https://stackoverflow.com/..strings-xml-in-android (spanned)
https://developer.android.com/studio/projects/templates.html
</website_guide>

หมายเหตุ 
ถ้าสนใจติดตามเนื้อหาในบล็อกนี้ สามารถ subscribe ด้วย email ที่อยู่ข้างขวา หรือ click here

Web Site Development Process – The life-cycle steps

กระบวนการพัฒนาเว็บไซต์
Web Site Development Process – The life-cycle steps
by Benny Alexander

Like the traditional software development, the process of web site development can also be divided into different life cycle steps. This can help to format the team effectively, and the standards and procedures can be adopted to achieve maximum quality. This article explains the steps of development which can be possibly arranged as a process of web engineering. This is just a guideline to help you, to know, how a process can be done. The steps may vary from application to application. Write me your suggestions and comments on this article to enquiry@macronimous.com.
A system development process can follow a number of standard or company specific frameworks, methodologies, modeling tools and languages. Software development life cycle normally comes with some standards which can fulfill the needs of any development team. Like software, web sites can also be developed with certain methods with some changes and additions with the existing software development process. Let us see the steps involve in any web site development.
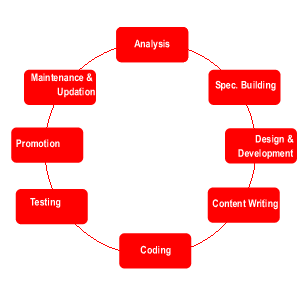
1. Analysis:
Once a customer is started discussing his requirements, the team gets into it, towards the preliminary requirement analysis. As the web site is going to be a part of a system, It needs a complete analysis as, how the web site or the web based application is going to help the present system and how the site is going to help the business. Moreover the analysis should cover all the aspects especially on how the web site is going to join the existing system. The first important thing is finding the targeted audience. Then, All the present hardware, software, people and data should be considered during the time of analysis. For example, if a company XYZ corp is in need of a web site to have its human resource details online, the analysis team may try to utilize the existing data about the employees from the present database. The analysis should be done in the way, that it may not be too time consuming or with very less informative. The team should be able to come up with the complete cost- benefit analysis and as the plan for the project will be an output of analysis, it should be realistic. To achieve this the analyst should consult the designers, developers and testers to come up with a realistic plan.
Input:Interviews with the clients, Mails and supporting docs by the client, Discussions Notes, Online chat, recorded telephone conversations,Model sites/applications etc.,
Output: 1. Work plan, 2. Cost involved, 3. Team requirements, 4. Hardware-software requirements, 5. Supporting documents and 6. the approval.
2. Specification Building:
Preliminary specifications are drawn up by covering up each and every element of the requirement. For example if the product is a web site then the modules of the site including general layout, site navigation and dynamic parts of the site should be included in the spec. Larger projects will require further levels of consultation to assess additional business and technical requirements. After reviewing and approving the preliminary document, a written proposal is prepared, outlining the scope of the project including responsibilities, timelines and costs.
Input: Reports from the analysis team.
Output: Complete requirement specifications to the individuals and the customer/customer’s representative.
3. Design and development:
After building the specification, work on the web site is scheduled upon receipt of the signed proposal, a deposit, and any written content materials and graphics you wish to include. Here normally the layouts and navigation will be designed as a prototype.
Some customers may be interested only in a full functional prototype. In this case we may need to show them the interactivity of the application or site. But in most of the cases customer may be interested in viewing two or three design with all images and navigation.
There can be a lot of suggestions and changes from the customer side, and all the changes should be freezed before moving into the next phase. The revisions could be redisplayed via the web for the customer to view.
As needed, customer comments, feedback and approvals can be communicated by
e-mail, fax and telephone.
Throughout the design phase the team should develop test plans and procedures for quality assurance. It is necessary to obtain client approval on design and project plans.
In parallel the Database team will sit and understand the requirements and develop the database with all the data structures and sample data will also be prepared.
Input: Requirement specification.
Output: Site design with templates, Images and prototype.
4. Content writing:
This phase is necessary mainly for the web sites. There are professional content developers who can write industry specific and relevant content for the site. Content writers to add their text can utilize the design templates. The grammatical and spelling check should be over in this phase.
Input: Designed template.
Output: Site with formatted content.
5. Coding:
Now its programmers turn to add his code without disturbing the design. Unlike traditional design the developer must know the interface and the code should not disturb the look and feel of the site or application. So the developer should understand the design and navigation. If the site is dynamic then the code should utilize the template. The developer may need to interact with the designer, in order to understand the design. The designer may need to develop some graphic buttons when ever the developer is in need, especially while using some form buttons. If a team of developers is working they should use a CVS to control their sources. Coding team should generate necessary testing plans as well as technical documentation. For example Java users can use JavaDoc to develop their documents to understand their code flow. The end-user documentation can also be prepared by the coding team, which can be used by a technical writer who can understand them, writes helps and manuals later.
Input: The site with forms and the requirement specification.
Output : Database driven functions with the site, Coding documents.
6. Testing:
Unlike software, web based applications need intensive testing, as the applications will always function as a multi-user system with bandwidth limitations. Some of the testing which should be done are, Integration testing, Stress testing, Scalablity testing, load testing, resolution testing and cross-browser compatibility testing. Both automated testing and manual testing should be done without fail. For example its needed to test fast loading graphics and to calculate their loading time, as they are very important for any web site. There are certain testing tools as well as some online testing tools which can help the testers to test their applications. For example ASP developers can use Microsoft’s Web Application Test Tool to test the ASP applications, which is a free tool available from the Microsoft site to download.
After doing all the testing a live testing is necessary for web sites and web based applications. After uploading the site there should be a complete testing(E.g.. Links test)
Input: The site, Requirement specifications, supporting documents, technical specifications and technical documents.
Output: Completed application/site, testing reports, error logs, frequent interaction with the developers and designers.
7. Promotion:
This phase is applicable only for web sites. Promotion needs preparation of meta tags, constant analysis and submitting the URL to the search engines and directories. There is a details article in this site on site promotion, click here to read it. The site promotion is normally an ongoing process as the strategies of search engine may change quite often. Submitting a site URLs once in 2 months can be an ideal submission policy. If the customer is willing, then paid click and paid submissions can also be done with additional cost.
Input: Site with content, Client mails mentioning the competitors.
Output: Site submission with necessary meta tag preparation.
8. Maintenance and Updating:
Web sites will need quite frequent updations to keep them very fresh. In that case we need to do analysis again, and all the other life cycle steps will repeat. Bug fixes can be done during the time of maintenance. Once your web site is operational, ongoing promotion, technical maintenance, content management & updating, site visit activity reports, staff training and mentoring is needed on a regular basis depend on the complexity of your web site and the needs within your organization.
Input: Site/Application, content/functions to be updated, re-Analysis reports.
Output: Updated application, supporting documents to other life cycle steps and teams.
The above-mentioned steps alone are not strict to web application or web site development. Some steps may not applicable for certain tasks. Its depend on the cost and time involved and the necessity. Sometimes if it is a intranet site, then there will be no site promotion. But even if you are a small development firm, if you adopt certain planning along with this web engineering steps in mind, it will definitely reflects in the Quality of the outcome.

contentslider javascript

content slider
content slider

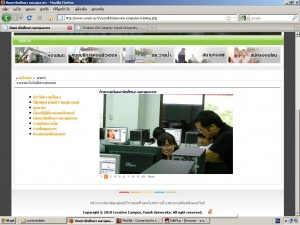
16 ต.ค.53 คุณธรณินทร์ สุรินทร์ปันยศ ช่วยให้ผมได้ศึกษาเรื่องของ การใช้ javascript ทำ slide show เมื่อเปรียบเทียบแล้วพบว่า ใช้งานได้ดีกว่า dm-album  ในกรณีนี้ ซึ่งปกติผมจะปิดกั้นตนเองไม่ศึกษาเรื่องแบบนี้ แต่ อ.ทันฉลอง รักษาการอธิการ มีนโยบายให้มีการปรับปรุงเว็บไซต์ทั้งระบบ ประกอบกับ code ชุดนี้ เคยถูกนำมาใช้งานโดย  startupthailand.com เมื่อแกะโค้ด ก็พบว่ามีการ import แฟ้ม contentslider.js เพียงแฟ้มเดียว ซึ่งนำไปใช้ได้ง่าย แล้วเผยแพร่ใน thaiall.com/java หัวข้อ 2.18 เพื่อให้นักพัฒนาคัดลอก .zip ที่มีตัวอย่างและปรับ code เบื้องต้นแล้ว .. (ปัญหา สร้าง โอกาส)

ต.ย.  http://www.thaiall.com/java/contentslider/contentslider.htm

และ http://www.thaiall.com/java/contentslider/contentslider.zip

http://www.thaiall.com/blog/burin/3205/