รวมทิป ของ PHP

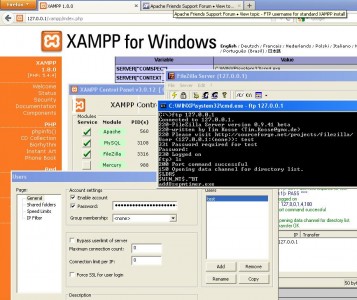
ftp test
ftp test

tip หมายถึง ข้อแนะนำ เกร็ดความรู้

– มีการเขียนทิป หรือหลักการ ของ php ไว้ไม่น้อย เขียนกันต่างบ้าง เหมือนกันบ้าง ล้วนระดมมาจากความรู้ และประสบการณ์
แล้วนำมาเรียบเรียงกันใหม่ .. ผมว่าอ่านดีครับ
– สังเกตเห็นว่า ปัจจุบันมีการเขียนกันไว้ใน blog แสดงว่า ความรู้ มักอยู่ใน blog ดังนั้นในกระบวนการ KM จึงมากใช้เป็นเครื่องมือในขั้นตอนหนึ่งของการจัดการความรู้
– สิ่งหนึ่งที่ทุกคนเหมือนกัน ถึงได้เขียนกันออกมา คือ อยากแบ่งปันความรู้ที่ได้จากการรวบรวม เรียบเรียง หรือผลทดสอบ นั่นเอง

http://www.thaiall.com/php/

http://mashable.com/2010/10/21/php-tips-for-beginners/

http://www.phpbuilder.com/columns/vaska20050722.php3

http://www.htmlgoodies.com/beyond/php/article.php/3907521/Top-10-PHP-Tips-for-Developers.htm

http://net.tutsplus.com/tutorials/php/quick-tip-7-super-handy-php-functions-for-beginners/

http://www.wmtips.com/php/tips-optimizing-php-code.htm

http://www.webdesigndev.com/programming/15-top-php-coding-tutorials-tips-and-tricks

http://coding.smashingmagazine.com/2008/11/18/10-advanced-php-tips-to-improve-your-progamming/
http://programming-4-u.blogspot.com/2012/05/10-php-tips-to-improve-your-programming.html

http://www.phpbuilder.com/columns/vaska20050812.php3

http://net.tutsplus.com/tutorials/php/10-principles-of-the-php-masters/

http://hungred.com/useful-information/php-micro-optimization-tips/

http://www.nerdparadise.com/tech/php/10tips/

การเพิ่ม hostname ใน localhost

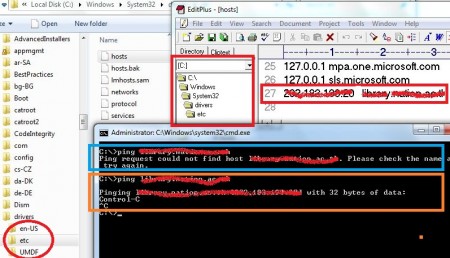
hosts ใน etc เพื่อแก้ไข local hostname

หากต้องการสร้าง host name ขึ้นมาใน Windows 7

เช่น burin.hello.com

แล้วเรียกใช้ http://burin.hello.com
ชี้ไปที่ 127.0.0.1
สามารถแก้ไขในเครื่องของตนเองให้รู้จักชื่อที่สร้างขี้น
ทำโดยแก้ไขแฟ้ม hosts ใน c:/windows/system32/drivers/etc
เมื่อแก้ไขแล้ว save as เป็นแฟ้มใหม่
แล้วลบแฟ้ม hosts เดิม
แล้วเปลี่ยนชื่อแฟ้มใหม่เป็น hosts
เพียงเท่านี้ก็ ping หรือเปิดเว็บได้แล้วครับ

config of quiz in moodle 1.9

config of quiz in moodle 1.9
11 ก.ค.55 มีโอกาสเตรียม quiz ที่ทำใน moodle เครื่องหนึ่งใช้ moodle 1.9 แล้ว backup นำไป restore ในอีกเครื่องหนึ่งที่ใช้ moodle 2.2 เพราะถ้าทำที่ server ตัวเดียว หากหายไปก็จะยุ่ง โดยบทเรียนครั้งนี้มีดังนี้
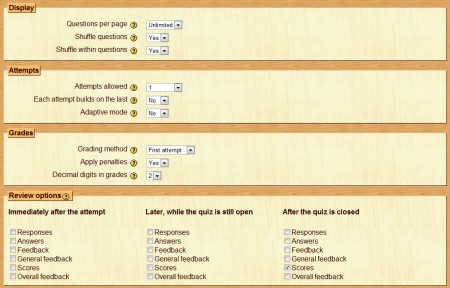
บันทึกค่า configuration สำหรับการสร้าง quiz ว่ากำหนดแบบใด ให้นักศึกษาทำครั้งเดียว และไม่มีเฉลยออกมาในเวลานั้น เพราะถ้าใช้ค่า default จะเปิดให้นักศึกษาทำได้หลายครั้ง ซึ่งเป็นการฝึกปฏิบัติ โดยกำหนดให้ shuffle แต่ไม่ Adaptive และ Attempt ซ้ำไม่ได้ และใช้คะแนนจาก First Attempt ส่วน review ก็แสดงเฉพาะคะแนนหลังทำเสร็จ
ตัวแรกอยู่ที่ http://www.thaiall.com/moodle เพื่อน ๆ เข้าไปเรียนรู้ได้ครับ

การเปิดบริการ iis7 บน windows 7

open asp & asp.net on iis7

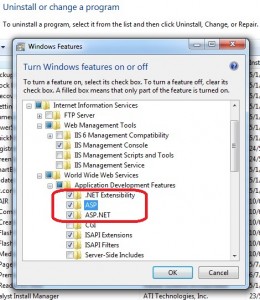
การเปิดบริการ iis7 บน windows 7 ผ่าน Control Panel, Programs and Features  , Turn Windows features on or off ถ้าเลือกเปิดบริการเฉพาะ Internet Information Services จะไม่บริการ ASP หรือ ASP.NET ถ้าต้องการบริการภาษา script  ก็ต้องเข้าไปเปิดบริการใน Internet Information Services, World Wide Web Services,  Application Development Features เพื่อให้รองรับแฟ้ม .asp หรือ .aspx  ในห้อง c:\inetpub\wwwroot

ถ้าต้องการเปลี่ยนห้อง

ก็ต้องเข้า Control Panel, Administrative Tools, Internet Information Services (IIS) Manager, Sites, Default Web Site, Basic Settings

อัพโหลดผู้ใช้เข้า moodle 2.2.1

moodle user upload
moodle user upload

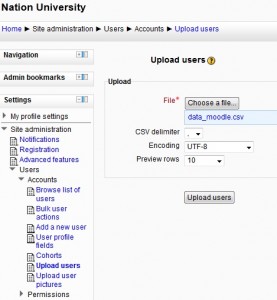
การอัพโหลด รายชื่อผู้ใช้เข้าระบบอีเลินนิ่งของ moodle มีเงื่อนไข ดังนี้ 1) บรรทัดละ 1 คน 2) ทุกบรรทัดมีหนึ่งระเบียน แต่ละระเบียน แบ่งแยกด้วย , หรือเครื่องหมายแล่งแยกอื่น 3) ระเบียนแรกให้เป็นชื่อเขตข้อมูล 4) ชื่อเขตข้อมูล คือ username, password, firstname, lastname, email

ผมมีข้อมูลเป็นอีเมล และต้องการใช้ email เป็นรหัสสำหรับ login เช่น xxx@yyy.com แล้วต้องการเฉพาะ xxx จึงใช้ฟังก์ชันด้านล่างนี้

=LOWER(MID(E2,1,FIND(“@”,E2)-1))

ในโปรแกรม excel เพื่อให้ได้แฟ้ม csv

ผลทดสอบส่ง  597 คน เข้าระบบ เรียบร้อยดีครับ

การติดตั้ง drupal 7.8

drupal
drupal

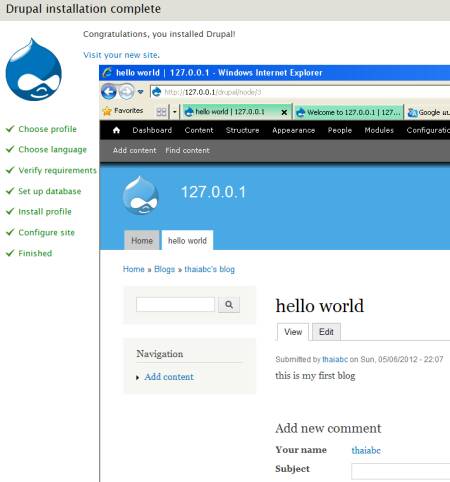
ขั้นตอนการติดตั้ง drupal ซึ่งทดสอบใน thaiabc.com มีดังนี้
1. create database = drupal ใน mysql
2. download script แล้ววางไว้ในห้อง drupal ของ root
3. เปิด http://127.0.0.1/drupal/install.php
4. เลือก standard, english
Set up database
Database name = drupal
Database username = root
Database password = ว่างไว้
5. ดำเนินการจนติดตั้งสำเร็จ
6. http://127.0.0.1/drupal
7. Create new account
username = test
8. เข้าระบบในฐานะ admin ด้วย
Username = thaiabc
Password = abc2008
9. menu, People,
click edit of “test” user
Password = test2008
Status = active
10. menu, Modules
Blog = Enabled
11. add blog or menu

ขั้นตอนการติดตั้ง moodle 1.9.12 และ senayan3

โปรแกรม senayan3
โปรแกรม senayan3

บันทึกขั้นตอน จากกิจกรรมปรับปรุงรุ่นของโปรแกรมแก้วสารพัดนึกใน thaiabc.com เป็นรุ่น 8.0 โดยเพิ่ม moodle1.9.12 จากที่มี moodle1.5 ทำให้มี e-learning ใช้ 2 รุ่นและเปรียบเทียบกันได้ เหตุผลที่เลือก 1.9 เพราะที่  thaiall.com/moodle ใช้รุ่นนี้มาปีกว่าแล้ว แต่ไม่ใช้รุ่น 2.0 ขึ้นไป ด้วยเหตุว่า backup ในรุ่น 2.0 จะนำไป restore ใน 1.9 ไม่ได้ ถ้านำ backup ของ 1.9 ไป restore ใน 2.0 นั้นทำได้ และจากการทดสอบ restore  course จาก thaiall.com/moodle ในเครื่องใหม่นี้ พบว่านำมาใช้ได้ตามปกติ

ขั้นตอนการติดตั้ง moodle 1.9.12

1. เปิดบริการ apache2.0.52 และ mysql5.5.16
ตอนเปิดบริการในเครื่องที่ติดตั้ง skype อาจพบปัญหา port 80 ชนกันได้ครับ
2. เตรียม scripts ในห้อง /moodle19
3. สร้างห้อง /moodledoc19 เตรียมรับข้อมูลจากผู้ใช้
4. เริ่มติดตั้งด้วยการเรียก /moodle19/install.php
5. ต้องแก้ไข register_globals=Off ใน php.ini แล้วก็ restart apache
ถ้าไม่รู้ว่า php.ini อยู่ห้องใดก็เรียก function phpinfo()
6. พบขั้นตอนการติดตั้งดังนี้
– Checking your PHP settings
– Please conform the locations of this Moodle installation
Web Address = http://127.0.0.1/moodle19
Data Directory = C:\thaiabc\moodledata
– Now you need to configure the database
Type = MySQL
Host Server = localhost
Database = moodle19 (Create DB automatically)
User = root
Password = ว่างไว้
– Checking your environment
– Download language pack
– Configuration completed
– Copyright notice
– Current release information Moodle 1.9.12 (Build: 20110510)
– Setting up database : Database was successfully upgraded
– Setup administrator account.
Username = admin
password = Password#2555
– New settings – Front Page settings
Self registration = Email-based self-registration
7. ผลการเรียก http://127.0.0.1/moodle19 พบว่าปกติ
8. สร้างวิชา และ upload แฟ้มภาพ และเรียกใช้แฟ้มภาพ ไม่พบปัญหา

ขั้นตอนการ Restore course ของ moodle 1.9.12
1. เข้าไปในวิชาที่สร้างไว้แล้ว
2. เลือก Restore
3. เลือกแฟ้มที่ Backup ไว้จาก server อีกตัวหนึ่ง
4. เมื่อถามว่า Restore to
– Current course, deleting it first
– Current course, ading data to it
– new course
5. ทดสอบทั้ง 3 แบบ พบว่าใช้งานได้ปกติ
6. ถ้าทดสอบ new course ก็จะได้วิชาใหม่อีก 1 วิชา ไม่ทับวิชาเดิม

ขั้นตอนการติดตั้ง senayan3
1. เปิดโปรแกรม phpmyadmin
2. สร้าง db : senayan3 แล้วเข้าไปใน db นี้
3. สั่งประมวลผล sql 2 แฟ้มในห้อง /senayan3/sql/install
4. เริ่มจาก import แฟ้ม senayan.sql ตามด้วย  sample_data.sql
5. แก้ไข sysconfig.inc.php
define(‘DB_NAME’, ‘senayan3’);
define(‘DB_USERNAME’, ‘root’);
define(‘DB_PASSWORD’, ”);
6. เข้าระบบด้วย
user: admin
password: admin
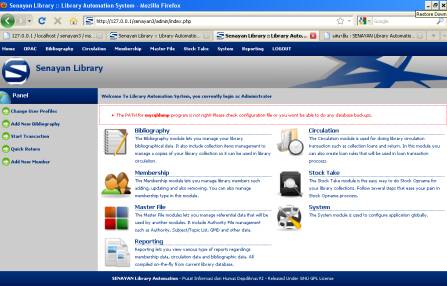
7. ทดสอบที่ http://127.0.0.1/senayan3 พบว่าใช้งานได้ปกติ
8. แก้ไขตัวแปรใน sysconfig.inc.php อีก 2 ตัวแปร
$sysconf[‘mysqldump’] = ‘c:/thaiabc/mysql/data’;
$sysconf[‘temp_dir’] = ‘c:/tmp’;

http://www.thaiall.com/blog/burin/3955/
http://slims.web.id/web/
http://sourceforge.net/projects/senayanlib/
http://www.senayan.kru-ple.com/

SENAYAN 3.0 stable
Core Senayan Developer :
Hendro Wicaksono – hendrowicaksono@yahoo.com
Arie Nugraha – dicarve@yahoo.com
Below are the instructions for new installation of SENAYAN :
1. Put senayan3-stable3 folder in web document root
2. create senayan database in mysql
3. Open your phpMyAdmin or mysql client utility (or other mysql manager softwares) and
run sql/install/senayan.sql inside your SENAYAN application database.
4. Re-check your database configurations and others configuration in sysconfig.inc.php.
5. If you have your own custom template, Adjust detail_template.php file or just overwrite it
with detail_template.php from default template directory

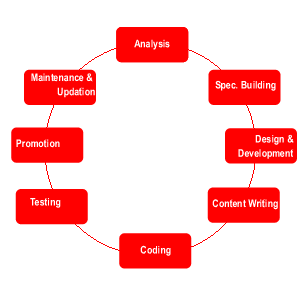
Web Site Development Process – The life-cycle steps

กระบวนการพัฒนาเว็บไซต์
Web Site Development Process – The life-cycle steps
by Benny Alexander

Like the traditional software development, the process of web site development can also be divided into different life cycle steps. This can help to format the team effectively, and the standards and procedures can be adopted to achieve maximum quality. This article explains the steps of development which can be possibly arranged as a process of web engineering. This is just a guideline to help you, to know, how a process can be done. The steps may vary from application to application. Write me your suggestions and comments on this article to enquiry@macronimous.com.
A system development process can follow a number of standard or company specific frameworks, methodologies, modeling tools and languages. Software development life cycle normally comes with some standards which can fulfill the needs of any development team. Like software, web sites can also be developed with certain methods with some changes and additions with the existing software development process. Let us see the steps involve in any web site development.
1. Analysis:
Once a customer is started discussing his requirements, the team gets into it, towards the preliminary requirement analysis. As the web site is going to be a part of a system, It needs a complete analysis as, how the web site or the web based application is going to help the present system and how the site is going to help the business. Moreover the analysis should cover all the aspects especially on how the web site is going to join the existing system. The first important thing is finding the targeted audience. Then, All the present hardware, software, people and data should be considered during the time of analysis. For example, if a company XYZ corp is in need of a web site to have its human resource details online, the analysis team may try to utilize the existing data about the employees from the present database. The analysis should be done in the way, that it may not be too time consuming or with very less informative. The team should be able to come up with the complete cost- benefit analysis and as the plan for the project will be an output of analysis, it should be realistic. To achieve this the analyst should consult the designers, developers and testers to come up with a realistic plan.
Input:Interviews with the clients, Mails and supporting docs by the client, Discussions Notes, Online chat, recorded telephone conversations,Model sites/applications etc.,
Output: 1. Work plan, 2. Cost involved, 3. Team requirements, 4. Hardware-software requirements, 5. Supporting documents and 6. the approval.
2. Specification Building:
Preliminary specifications are drawn up by covering up each and every element of the requirement. For example if the product is a web site then the modules of the site including general layout, site navigation and dynamic parts of the site should be included in the spec. Larger projects will require further levels of consultation to assess additional business and technical requirements. After reviewing and approving the preliminary document, a written proposal is prepared, outlining the scope of the project including responsibilities, timelines and costs.
Input: Reports from the analysis team.
Output: Complete requirement specifications to the individuals and the customer/customer’s representative.
3. Design and development:
After building the specification, work on the web site is scheduled upon receipt of the signed proposal, a deposit, and any written content materials and graphics you wish to include. Here normally the layouts and navigation will be designed as a prototype.
Some customers may be interested only in a full functional prototype. In this case we may need to show them the interactivity of the application or site. But in most of the cases customer may be interested in viewing two or three design with all images and navigation.
There can be a lot of suggestions and changes from the customer side, and all the changes should be freezed before moving into the next phase. The revisions could be redisplayed via the web for the customer to view.
As needed, customer comments, feedback and approvals can be communicated by
e-mail, fax and telephone.
Throughout the design phase the team should develop test plans and procedures for quality assurance. It is necessary to obtain client approval on design and project plans.
In parallel the Database team will sit and understand the requirements and develop the database with all the data structures and sample data will also be prepared.
Input: Requirement specification.
Output: Site design with templates, Images and prototype.
4. Content writing:
This phase is necessary mainly for the web sites. There are professional content developers who can write industry specific and relevant content for the site. Content writers to add their text can utilize the design templates. The grammatical and spelling check should be over in this phase.
Input: Designed template.
Output: Site with formatted content.
5. Coding:
Now its programmers turn to add his code without disturbing the design. Unlike traditional design the developer must know the interface and the code should not disturb the look and feel of the site or application. So the developer should understand the design and navigation. If the site is dynamic then the code should utilize the template. The developer may need to interact with the designer, in order to understand the design. The designer may need to develop some graphic buttons when ever the developer is in need, especially while using some form buttons. If a team of developers is working they should use a CVS to control their sources. Coding team should generate necessary testing plans as well as technical documentation. For example Java users can use JavaDoc to develop their documents to understand their code flow. The end-user documentation can also be prepared by the coding team, which can be used by a technical writer who can understand them, writes helps and manuals later.
Input: The site with forms and the requirement specification.
Output : Database driven functions with the site, Coding documents.
6. Testing:
Unlike software, web based applications need intensive testing, as the applications will always function as a multi-user system with bandwidth limitations. Some of the testing which should be done are, Integration testing, Stress testing, Scalablity testing, load testing, resolution testing and cross-browser compatibility testing. Both automated testing and manual testing should be done without fail. For example its needed to test fast loading graphics and to calculate their loading time, as they are very important for any web site. There are certain testing tools as well as some online testing tools which can help the testers to test their applications. For example ASP developers can use Microsoft’s Web Application Test Tool to test the ASP applications, which is a free tool available from the Microsoft site to download.
After doing all the testing a live testing is necessary for web sites and web based applications. After uploading the site there should be a complete testing(E.g.. Links test)
Input: The site, Requirement specifications, supporting documents, technical specifications and technical documents.
Output: Completed application/site, testing reports, error logs, frequent interaction with the developers and designers.
7. Promotion:
This phase is applicable only for web sites. Promotion needs preparation of meta tags, constant analysis and submitting the URL to the search engines and directories. There is a details article in this site on site promotion, click here to read it. The site promotion is normally an ongoing process as the strategies of search engine may change quite often. Submitting a site URLs once in 2 months can be an ideal submission policy. If the customer is willing, then paid click and paid submissions can also be done with additional cost.
Input: Site with content, Client mails mentioning the competitors.
Output: Site submission with necessary meta tag preparation.
8. Maintenance and Updating:
Web sites will need quite frequent updations to keep them very fresh. In that case we need to do analysis again, and all the other life cycle steps will repeat. Bug fixes can be done during the time of maintenance. Once your web site is operational, ongoing promotion, technical maintenance, content management & updating, site visit activity reports, staff training and mentoring is needed on a regular basis depend on the complexity of your web site and the needs within your organization.
Input: Site/Application, content/functions to be updated, re-Analysis reports.
Output: Updated application, supporting documents to other life cycle steps and teams.
The above-mentioned steps alone are not strict to web application or web site development. Some steps may not applicable for certain tasks. Its depend on the cost and time involved and the necessity. Sometimes if it is a intranet site, then there will be no site promotion. But even if you are a small development firm, if you adopt certain planning along with this web engineering steps in mind, it will definitely reflects in the Quality of the outcome.

plain slide

content & platform
content & platform

มีโอกาสฟังผู้ใหญ่พูดถึง content กับ platform จึงคิดได้ว่า ถ้านำ content เข้าไปใส่ใน powerpoint แบบไม่แต่ง และแบ่งเป็นไฟล์ ที่นึกว่าเสมือน jigsaw ทำให้สามารถนำมารวมกันใหม่ หรือแก้ไขตามหัวข้อได้ง่าย ก็จะเป็นระบบฐานข้อมูล content ผ่าน platform แบบ powerpoint ซึ่งการนำเสนองานด้วย powerpoint เป็นที่นิยมมากที่สุดมากกว่าทุกรูปแบบ

แต่เดิมนั้น ผมเคยทำเป็น content เป็น webpage, sound, clip, glossary, elearning, text หรือ db ในครั้งนี้ก็ถึงคราวของการสร้าง content บน plain slide เสมือน jigsaw แต่ละหัวข้อ ที่สามารถนำไปประกอบเป็น chapter หรือ course ได้ในภายหลัง วันนี้กว่าจะทำแต่ละชิ้นได้ก็ใช้เวลา เริ่มต้นก็สร้างไปประมาณ 4 แฟ้ม หัวข้อเกี่ยวกับ information แล้วเผยแพร่ผ่าน http://www.thaiall.com/pptx ที่ใช้ชื่อห้องนี้ เพราะใช้โปรแกรม powerpoint 2010 ในการจัดทำ

ระบบช่วย sign on ชั้นที่ 2 หลังผ่านชั้นแรก

php sign on code
php sign on code

28 มี.ค.55 มีเพื่อนในทีมพัฒนาระบบตรวจสอบสมาชิก หรือยืนยันตัวตน ขึ้นอีกระบบหนึ่ง ซึ่งใช้ user และ password ต่างไปจากชุดเดิม เป็นแบบกำหนดเฉพาะบางคนที่มีสิทธิ หากผ่านการตรวจสอบจากระบบแรก ผมจึงเขียน script ด้วย php ตรวจว่ามีค่า session ส่งมาจากระบบแรกหรือไม่ ถ้ามีและอยู่ในรายการที่กำหนด ก็จะส่งรหัสให้กับฟอร์ม เพื่อให้ผู้ใช้คลิ๊กเข้าระบบที่สอง ซึ่งระบบที่สองตรวจสอบผู้ใช้ผ่าน post โดย javascript ถูกเขียนอย่างหลวม ๆ ให้สามารถปรับแต่งต่อได้
โดยต้นแบบมาจากระบบ submit search จาก http://www.thaiall.com/search.htm

<?
session_start();
$page = "http://www.hot.com/login.php";
$user = "your username"; 
$passwd = "your password";
$u = array("101","102");
$pass = 0;
foreach ($u as $v) {
  if (isset($_SESSION["id"]) && $_SESSION["id"] == $v) { $pass = 1;}
}
if ($pass == 0) {
foreach ($u as $v) { echo $v. "<br/>"; }
echo "<br/><a href='http://www.thaiall.com'>back</a>";
exit;
}
?>
<html><head><title>admin login</title></head>
<script language="JavaScript"> 
function newpage() {
page = "<?=$page;?>";
u = document.f.username.value;
p = document.f.passwd.value;
o = window.open('blank.htm','y',"toolbar=yes");
o.document.open();
o.document.write("<body><form name='y' action='" +  page + "' method='post'>");
o.document.write("<input name='u' value=''><input name='p' value=''></form>");
o.document.close();
o.document.y.u.value = u;
o.document.y.p.value = p;
o.document.y.submit();
} 
</script>
<body>
<form name="f">
<input type=button value="click to open in new page" onclick="newpage()">
<input type=hidden name=username value="<?=$user;?>">
<input type=hidden name=passwd value="<?=$passwd;?>">
</form>
</body></html>